Issuetrak offers integration with Microsoft Entra ID via the Identity Management area of the product. The advantages of utilizing Entra ID with Issuetrak are very similar to those from using AD Federation Services:
- Issuetrak never has the user's credentials.
- There is no need to use an Active Directory service account.
- The nature of Entra ID prevents applications from pulling information outside of the scope of an authenticated user.
Entra ID integration is licensed under the Identity Management add-on. If you would like to purchase support for Identity Management, please get in touch with your Account Manager.
Note that using Entra ID with Issuetrak requires:
- That your site is configured to use SSL
- That your site's SSL certificate is not self-signed, and can be verified with its issuer
- That your site and Entra can communicate over standard web ports 80 and 443
- A "Hybrid" environment backed by Active Directory/LDAP (if it is desired for Asset Management assets to be properly matched to Entra ID users, as applicable)
Preparing Your Entra ID Instance for use with Issuetrak
You will need to pre-register Issuetrak with your Entra ID instance before the two can communicate.
Steps:
- Open your Azure Management interface.
- Navigate to App Registrations.
- Click New registration.
- Enter a name for the new app registration.
- You'll be prompted to select the Account Type. We suggest using "Accounts in this organizational directory only (OrganizationName only - Single tenant)".
- If you're using a multi-tenant app, then a Microsoft Partner Center ID will need to be added under the branding option after the initial registration.
- Select Web in the Select a platform dropdown option under "Redirect URI (optional)" and enter the URL to your Issuetrak site with the following modifiers:
- https://IssuetrakSite/core/login/adfs
- Click Register.
- Take note of the following information, as it will be needed to configure Issuetrak later:
- Application (client) ID
- Directory (tenant) ID
- Now find and click Authentication in the lefthand menu, then add the following Redirect URIs, taking care to populate your Issuetrak site's external-facing address where IssuetrakSite appears:
- https://IssuetrakSite/core/adfs/verifyPassword
- https://IssuetrakSite/core/adfs/testconnection
- Click Save.
- Find and click Certificates & secrets in the lefthand menu.
- If you're going to use certificate authentication (which we highly recommend), there are multiple methods to generate a certificate. The steps to create an Issuetrak certificate can be found in our Using Certificate Authentication with Microsoft Applications article.
- Click Upload a certificate.
- You'll be prompted to navigate to the path of a certificate on your local machine. Find the certificate that you downloaded from the article above. It will use the PEM file extension.
- (Optional) Add description for this certificate.
- Click Add.
- It is possible to use 3rd party certificates or certificates generated in the Azure platform. In which case, the certificate would need to be uploaded to the Azure application as part of the above steps and also in step 3 for adding a provider below.
- If you intend to use a client secret, then click New client secret.
- Enter a description for this secret. It is suggested that you make it clear that this is used for your Issuetrak site.
- Select an expiration date.
- We recommend using the Scheduled Issues feature in your Issuetrak site to set up a reminder before the client secret is due to expire.
- Click Add.
- Take note of the secret value that appears below! You will need this later and it won't be shown again!
- If you're going to use certificate authentication (which we highly recommend), there are multiple methods to generate a certificate. The steps to create an Issuetrak certificate can be found in our Using Certificate Authentication with Microsoft Applications article.
- Find and click Token configuration in the lefthand menu.
- Add the Optional Claims:
- Click Add optional claim.
- Select the ID token type.
- Check the boxes to add the following claims:
- email (required)
- family_name (required)
- given_name (required)
- onprem_sid (If migrating from an existing LDAP domain OR it is desired to match Asset Management assets to users from Entra ID)
- Click Add.
- Check the box in the pop-up that appears with this prompt: "Turn on the Microsoft Graph email, profile permission (required for claims to appear in token)."
- Click Add.
- Add the Group Claims:
- Click Add Groups Claim.
- Check the box next to All Groups (includes 3 group types: security groups, directory roles, and distribution lists). This will select three checkboxes, which is exactly what we want:
- Security Groups
- Directory Roles
- All Groups
- Click Add.
Now we're ready to configure Issuetrak.
Adding an Entra ID Provider
Steps:
- Click the gear icon in the upper right > click on Microsoft Applications beneath Integrations.
- Click Add New.
- Fill in the required information:
- Name - What this provider will be called in Issuetrak.
- Cloud Type - Determines the connection method between Issuetrak and Entra ID.
- Tenant ID - You should have this from the section above.
- Client ID - You should have this from the section above.
- Authentication Type:
- Client Secret - If you generated this in the previous section, then you should populate this value.
- Upload Certificate - This assumes you have a certificate from a third party to upload. If you select this, click on "Select PEM/PFX File" and enter the password for the certificate, if there is one. Afterward, click "Save and Download Public Key".
- Create New Certificate - Your Issuetrak site will generate a certificate. If you select this, click on "Save and Download Public Key" to download the certificate. Follow these steps to upload this certificate to your app registration.
- If you are not currently using an Identity Management integration with Issuetrak, then go ahead and enable the Identity Management Module.
- Click the gear icon in the upper right > click on Microsoft Entra ID beneath Identity Management.
- From the right quick menu, click Add Provider.
- Fill in the required information:
- Domain: The Domain of your Entra ID instance. Ensure this matches the domain currently in your Issuetrak instance's AD settings.
- Application: The label of the application you created in steps 1-3 above.
- Button Label: The label for the button associated with this authentication method that will be added to your site's login screen.
- Set the Button configuration along the right.
- Click Save.
Creating User Mappings for Entra ID
The final step to configuring Entra ID is to create mappings for user accounts. Without a minimum of Organization and Template mappings, users will be unable to sign in using the identity provider you configured.
Issuetrak uses identity claims to map users to the correct organizations, user templates, locations, departments, and any user account UDFs that are configured. This is more constrained than using traditional mappings from AD LDAP or AD Federation Services.
Mapping User Templates
Steps:
- Click the gear icon in the upper right > click on Entra ID beneath Identity Management.
- Click edit next to the provider that you wish to set mappings for.
- Scroll down to the Define Template Mapping section.
- Set the Priority. Priority determines whether this mapping takes precedence over other mappings of the same type that match. A lower number indicates a higher priority.
For example, if two User Template mappings named Alpha (Priority 1) and Bravo (priority 2) are matched to the same user account, the mapping with the higher priority (lower number) takes precedence. Thus, a user account that matches both templates' criteria will be mapped to Alpha.
- Enter the name of the Claim that will be scanned by Issuetrak to determine the origin of this mapping.
- Enter the Matching Value that applies to the claim.
- You may choose to toggle "Exact Match" for this mapping.
- Select which User Template this claim should be mapped to upon a successful match.
- Click Save.
Mapping Organizations
Steps:
- Click the gear icon in the upper right > click on Entra ID beneath Identity Management.
- Click edit next to the provider that you wish to set mappings for.
- Scroll down to the Define Organization Mapping section.
- Set the Priority. Priority determines whether this mapping takes precedence over other mappings of the same type that match. A lower number indicates a higher priority.
For example, if two Organization mappings named Alpha (Priority 1) and Bravo (priority 2) are matched to the same user account, the mapping with the higher priority (lower number) takes precedence. Thus, a user account that matches both Organizations' criteria will be mapped to Alpha.
- Enter the name of the Claim that will be scanned by Issuetrak to determine the origin of this mapping.
- Enter the Matching Value that applies to the claim.
- You may choose to toggle "Exact Match" for this mapping.
- Select which Organization this claim should be mapped to upon a successful match.
- Click Save.
Mapping Locations
Steps:
- Click the gear icon in the upper right > click on Entra ID beneath Identity Management.
- Click edit next to the provider that you wish to set mappings for.
- Scroll down to the Define Location Mapping section.
- Set the Priority. Priority determines whether this mapping takes precedence over other mappings of the same type that match. A lower number indicates a higher priority.
For example, if two Location mappings named Alpha (Priority 1) and Bravo (priority 2) are matched to the same user account, the mapping with the higher priority (lower number) takes precedence. Thus, a user account that matches both Locations' criteria will be mapped to Alpha.
- Enter the name of the Claim that will be scanned by Issuetrak to determine the origin of this mapping.
- Enter the Matching Value that applies to the claim.
- You may choose to toggle "Exact Match" for this mapping.
- Select which Location this claim should be mapped to upon a successful match.
- Click Save.
Mapping Departments
Steps:
- Click the gear icon in the upper right > click on Entra ID beneath Identity Management.
- Click edit next to the provider that you wish to set mappings for.
- Scroll down to the Define Department Mapping section.
- Set the Priority. Priority determines whether this mapping takes precedence over other mappings of the same type that match. A lower number indicates a higher priority.
For example, if two Department mappings named Alpha (Priority 1) and Bravo (priority 2) are matched to the same user account, the mapping with the higher priority (lower number) takes precedence. Thus, a user account that matches both Departments' criteria will be mapped to Alpha.
- Enter the name of the Claim that will be scanned by Issuetrak to determine the origin of this mapping.
- Enter the Matching Value that applies to the claim.
- You may choose to toggle "Exact Match" for this mapping.
- Select which Department this claim should be mapped to upon a successful match.
- Click Save.
User Property Mappings
There is one Claim automatically mapped by default, for Email. This can be edited or deleted if necessary.
Additionally, three claims are mandatory and automatically mapped to fields for each user. They are mapped as follows:
- SamAccountName -> User Id
- Given_Name -> First Name
- Family_Name -> Last Name
The SamAccountName mapping cannot be modified or deleted. Any other Claim can be mapped to any UDF or unused field in a user account. All Claims showing, except for the three listed above, can be edited or removed if needed.
Mapping User Properties
Steps:
- Click the gear icon in the upper right > click on Entra ID beneath Identity Management.
- Click edit next to the provider that you wish to set mappings for.
- Scroll down to the Define User Property Mapping section.
- Enter a Claim name.
- Select the field in the dropdown to map the Claim to.
- Click Save.
Testing User Mappings
The Test User Mappings button provides the capability to authenticate a user account and immediately display the mappings that are applied to that account. It is recommended for customers to test user account mappings by creating a 'dummy' AD account that has the same mappings as the target user(s), then authenticate that user via the Test User Mappings prompt to check the mappings.
Even if you're just testing the mappings, if it's the first time Issuetrak is attempting to authenticate via Entra ID, then it will display a prompt that may seem unexpected. See the section below for more information on this.
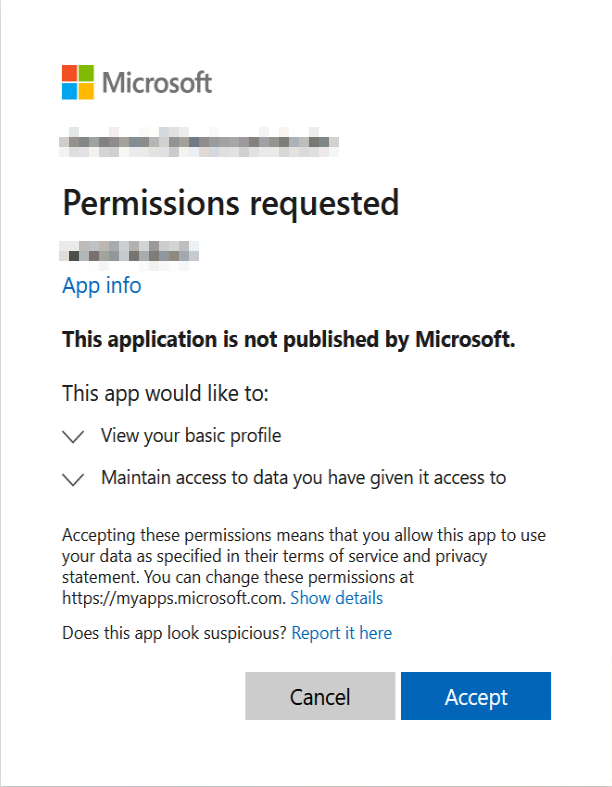
First Time Signing into Issuetrak via Entra ID
The first time you attempt to sign into Issuetrak with your Entra ID credentials, you will be greeted with a prompt in your browser to provide permissions to Issuetrak to use Entra ID for authentication. You must accept this in order for Entra ID integration with Issuetrak to work.
The prompt will look something like this:
Deactivating an Entra ID Provider in Issuetrak
If at any point you wish to prevent user logins to Issuetrak from a specific Entra ID provider you may deactivate that provider. If you would like to deactivate the full Identity Management module in Issuetrak, please refer to this article.
Steps:
- Click the gear icon in the upper right > click Entra ID beneath Identity Management.
- Click edit next to the provider that you wish to inactivate the Entra ID connection to.
- Uncheck the box next to Active.
- Click Save.
