You can set, manage, and monitor service expectations for your clients through the Service Level Agreements (SLAs) configuration option. SLAs help improve accountability and quality of service, especially when used in conjunction with any ITIL Service Level Management (SLM) best practices.
Terminology and Functionality
In a basic SLA scenario, an issue needs an initial response and complete resolution within a certain set of time frames. Exactly which time frames apply and when is automatically determined by a series of values, including its Severity and the Service Level defined within the Service Level Agreement for that particular Organization, Group, or Asset. Throughout the life cycle of this issue, Compliance with the relevant Service Terms is also closely tracked through a number of reporting functions and—as needed—progressively reinforced with automatic email reminders and alerts.
In scenarios where multiple SLAs could apply to an issue, the SLA with the shortest response time will apply. In the case of a tie, the agreement that was created first will apply. However, if an applicable Asset-based SLA exists, it will always take precedence over other SLAs, even if another SLA has stricter terms or a shorter response time.
It’s best to be familiar with several terms going forward:
| Term | Definition |
|---|---|
| Severity | Rating the issue’s impact on the organization, which ultimately determines the issue Response and Resolution Times by its link to Service Levels and associated Agreements. |
| Response Time | Allowed time for someone other than the issue submitter to add a public note in reply to the issue. |
| First Response | The first public note reply on an issue by a user that isn't the submitter. This can also be manually set by a user with "Can edit Issues" and "Can Modify the First Response Time entered in Issues" permissions. |
| Resolution Time | Allowed time to close the issue. |
| In Compliance | Issue responded to within Response Time and closed within Resolution Time. |
| Out of Compliance | Issue not responded to within Response Time or closed beyond Resolution Time. |
| Service Level | Set of terms defining applicable days and times, Response Times, and Resolution Times for each Severity. |
| Agreement | Used to apply a Service Level and default Severity to an issue based on the primary Organization or Group of either the Submitter or Assignee, depending on system settings. For Assets, the Service Level and default Severity are applied based solely on the selected Asset, regardless of the Submitter or Assignee. |
Setting Up SLAs
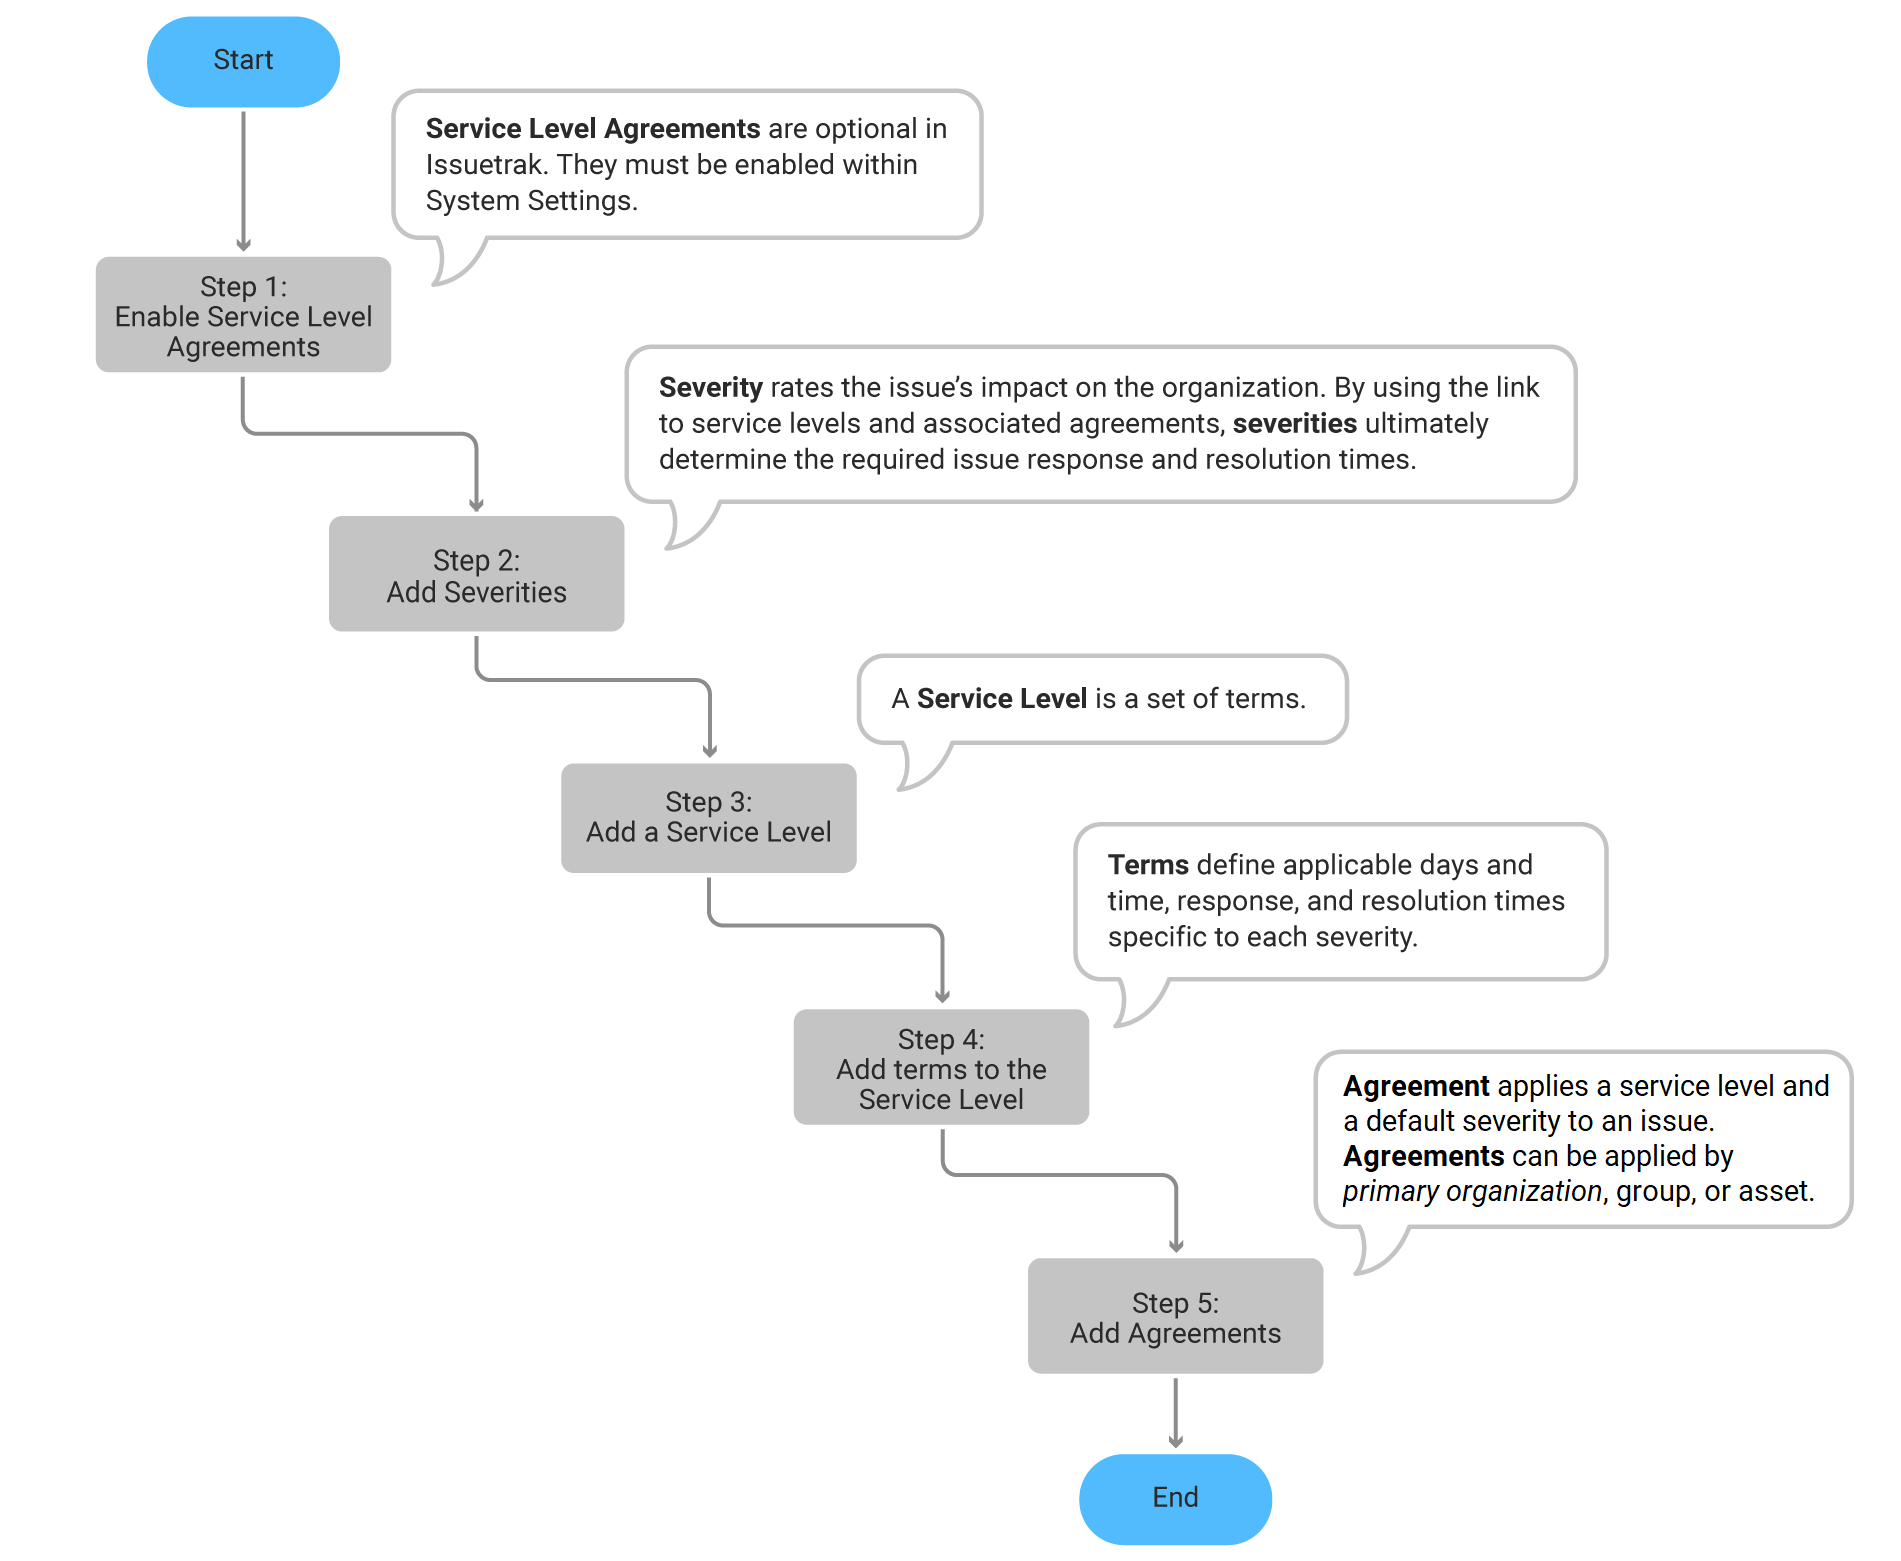
The initial setup required for implementing SLAs involves five tasks. These tasks must be completed in this order—but do not have to be completed all at one time. Click on any of the links below for steps on each specific stage of the process:
- Activating SLAs
- Adding Severities
- Adding Service Levels
- Adding Service Terms
- Adding Service Agreements
Activating SLAs
Only users with Sys Admin permissions can activate SLAs within your system. Only users with Sys Admin or Can access and maintain Administration functions permissions can add, edit or delete Severities, Service Levels, Service Terms, and Service Agreements within your system.
Service Level Agreements are optional in Issuetrak. When enabling the feature you will need to decide if you want your SLAs to be applied based on the Issue Submitter or the Issue Assigned To value.
- Issue Assigned To – Based on the Assignee of the issue. When an issue is assigned to an individual User, a Service Level can be applied based on the User’s primary Organization or a Group that the User is a member of if an SLA exists for that Organization or Group. When an issue is assigned to a Group, a Service Level can be applied based on the Group itself or the Group’s primary Organization if an SLA exists for that Group or Organization. For example, two issues with the same Severity could have different Service Levels depending on which User or Group the issue is assigned to.
- Issue Submitted By – Based on the Submitter of the issue. When an issue is submitted by a User, a Service Level can be applied based on the User’s primary Organization or a Group that the User is a member of if an SLA exists for that Organization or Group. For example, an issue submitted by one customer Organization could have a different Service Level than an issue submitted by another customer Organization.
Asset-based SLAs are applied solely based on the Asset associated with the issue and are not affected by the Submitter or Assignee. Any issue associated with an Asset that has an SLA will receive that SLA, provided the issue’s selected Severity has terms configured for the SLA’s Service Level.
Steps:
- Click the gear icon in the upper right to open the Settings Lightbox > Service Level Agreements beneath Tools.
- Select Use SLAs and choose the option your SLAs are to be applied based on (In either of these configurations, Asset-related Agreements will always take precedence over all other Agreements).
- Click Update.
A confirmation message will appear when this process is complete and the Service Level Agreements option will appear in the Tools section of the Settings Lightbox.
Reporting on SLAs
With SLAs applied, additional information is available via the Dashboard and reports.
Dashboard
The dashboard allows you to see graphical depictions of data from various parts of your site, including Service Level Agreements. With just a few clicks, you can include SLA-related information on your dashboard.
Steps:
- From the left menu, click on Issues > Dashboard.
- Towards the upper right area of your dashboard, click on Dashboard Settings.
- Next to the "Select a panel" dropdown menu, find and select any of the following, one at a time:
- Open Issues by Severity
- Issues by Compliance Status
- Current Qtr Performance
- Monthly Performance
- Click on either Add to Left Column or Add to Right Column, depending on your preference.
- Optional: Check the box next to Start Expanded?
- Click Set as My Dashboard to set it just for you, or click Set as Default to set it for everyone with dashboard access.
Your dashboard will now display SLA-related information.
Summary Report
You can also view SLA information in Summary Reports, which are reports that come with Issuetrak that you can easily use without creating a custom report in Report Writer.
Steps:
- From the left menu, click on Reporting > Summary Reports.
- Select one of the following, and then click Run:
- Summary of SLA Issues
- Summary of SLA Issues by Assignee
- Summary of SLA Issues by Next Action
- Enter a Date Range and (optionally) a Sort By method.
- Click Show Report.
If there is data applicable to the report you selected, it will display on-screen.
Report Writer Report
You can use Report Writer to find and display SLA-related information.
Steps:
- From the left menu, click on Reporting > Custom Reports.
- Click New Report.
- Enter a descriptive name for the report so that you can easily find it later.
- In the Data Sets dropdown, select one of the following, depending on the scope of your interest:
- Groups / SLAs
- Issues / Assignments / SLAs for Groups
- Issues / Assignments / SLAs for Organizations
- Issues / Service Contracts
- Issues / SLAs for Groups
- Issues / SLAs for Organizations
- Organizations / SLAs
- Click and drag the data fields that you want to be included in the report from the "Available Fields" column to the "Selected Fields" column, then click Next.
- If desired, create a filter for the data to narrow the scope of information captured in the report. You can find out more about filtering information in a report here. Click Save & Run.
You will see the results of your report appear.
Want to go a step further, and regularly receive this report via email? Have a look at Scheduled Reports.
Deactivating SLAs
Steps:
- Click the gear icon in the upper right to open the Settings Lightbox > Features beneath System, then scroll down to the Service Level Agreements section.
- Deselect Use SLAs and then click the Update button.
A confirmation message will appear when this process is complete.
Severities organize (SLA and optionally non-SLA) issues into categories based on their impact on the user or overall user base. These categories can have generic (e.g. Severity 1, Severity 2, Severity 3) or fairly descriptive (e.g. Major, Moderate, Minor, Minimal) names. Either way, any users permitted to select Severity can access detailed definitions by clicking the descriptions link beside the Severity field on the Submit Issue page.
All users can view Severity-related data within issues and reports, but only users with Can select Severity when submitting or maintaining issues permissions can select or update an issue’s Severity.
While the Severity field is included on all issues in sites where the SLA feature is enabled, a value is only required for issues that need an SLA applied. In addition, only SLA issues are automatically updated with a Default Severity when users cannot or do not specifically select one. This default value is determined by the Service Level Agreement that is applied.
Adding Severities
The following steps must be repeated for each Severity you want to include in your system. Keep in mind that each Severity typically requires its own Service Terms within each Service Level when an SLA is intended to be applied to issues using that Severity. In some cases, however, a Severity may be configured without Service Terms if no SLA should apply to issues using that Severity.
Steps:
- Click the gear icon in the upper right > click Service Level Agreements beneath the Tools header.
- Click Add beneath the Severities area of the right quick menu.
- Enter a name for the new Severity.
- Enter a Description that helps permitted users determine when to select this Severity on an issue.
- From the Submit and Edit Issue screens, hovering over or clicking on descriptions next to the Severity field will open a popup list of all current Severities and their descriptions.
- (Optional) Define this Severity’s Display Order (e.g. 3 = third place) within related lists and drop-downs.
- Click Save.
A confirmation message will appear when this process is complete.
Editing Severities
Steps:
- Click the gear icon in the upper right > click Service Level Agreements beneath the Tools header.
- Click edit next to the Severity you are modifying.
- Make your changes on the Edit Severity screen that opens.
- Click Update.
A confirmation message will appear when this process is complete.
Deleting Severities
Steps:
- Click the gear icon in the upper right > click Service Level Agreements beneath the Tools header.
- Click del next to the Severity that you wish to delete.
- Click OK when prompted to confirm.
A confirmation message will appear when this process is complete.
The third step in the Service Level Agreement setup is creating Service Levels. Service Levels establish the quality of service categories (e.g. Platinum, Gold, Silver, Bronze) available through an SLA. Only the name of the Service Level is required. Viewing the list of Service Levels gives you the ability to add your Response and Resolution Times for each Severity by clicking “terms.”
Only users with Sys Admin or Can access and maintain Administration functions permissions can add, edit or delete Service Levels within your system.
Adding Service Levels
The following steps must be repeated for each Service Level you want to offer. Keep in mind that every Service Level you add will require its own Service Terms for each Severity you have added.
Steps
- Click the gear icon in the upper right > click Service Level Agreements beneath the Tools.
- Click Add beneath the Service Levels area of the right quick menu.
- (Optional) Define this Service Level’s Display Order (e.g. 3 = third place) within related lists and drop-downs.
- (Optional) Enter any Comments (e.g. standard pricing or length) you want to record with this Service Level. This information will be displayed only from the Edit Service Level screen.
- Click Save.
A confirmation message will appear when this process is complete.
Editing Service Levels
Clicking edit only allows you to change the name of the Service Level. To change setting specifics for that Service Level you will need to modify its Service Terms.
Steps
- Click the gear icon in the upper right > click Service Level Agreements beneath the Tools header.
- Click List beneath the Service Levels area of the right quick menu.
- Click edit next to the Service Level you are modifying.
- Make your changes on the Edit Service Level page that opens.
- Click Update.
A confirmation message will appear when this process is complete.
Deleting Service Levels
Steps
- Click the gear icon in the upper right > click Service Level Agreements beneath the Tools header.
- Click List beneath the Service Levels area of the right quick menu.
- Click del next to the Service Level you are deleting.
- Click OK when prompted to confirm.
A confirmation message will appear when this process is complete.
The fourth step in the Service Level Agreement setup is creating terms for Service Levels established in the previous step. Compliance with your Terms is calculated (and re-calculated if relevant Terms change) from the date and time an SLA issue is submitted and only during appropriate Coverage times. However, any Total Time Open Escalations will still accrue according to Hours of Operation. This means your Hours of Operation are not affected by your Terms, nor do they have any effect on your Terms.
Interactive Issue Timeline Simulator
- What it is:
A hands-on simulator that models a issue's progression across 11 key lifecycle milestones, helping visualize how service level calculations work throughout an issue’s lifecycle. - Relation to Service Level Terms:
The simulator demonstrates how configured terms, such as a 2-hour response target or 12-hour resolution target, are applied in real time based on issue submission time, coverage schedules, and workflow activity. - The Two Clocks:
It shows how the SLA compliance clock and the Total Time Open (TTO) clock operate independently from the moment an issue is submitted. - How to use it: Use the Previous and Next buttons at the bottom of the tool, or click the flashing dots in the Events swim lane, to move through the scenario step-by-step.
- What to look for:
Watch how changes in issue substatus, such as Waiting on Customer, pause the SLA clock while the TTO clock continues accumulating time during normal business hours.
SLA vs Total Time Open
How two independent clocks run from the same issue submission.
7:00 AM to 7:00 PM
9:00 AM to 5:00 PM
Adding Service Terms
Only users with Sys Admin or Can access and maintain Administration functions permissions can add, edit or delete Service Terms within your system.
The following steps must be repeated for every Service Level you have added to your system.
Steps:
- Click the gear icon in the upper right > click Service Level Agreements beneath the Tools header.
- Click Add beneath the Service Levels area of the right quick menu.
- Click terms next to the Service Level that will contain the terms you are adding.
- Start by selecting the Severity you want to add to the Service Level.
- On the Service Level Terms page, define the Time to Response, Time to Resolution, and Coverage Days and Coverage Times that apply at this Service Level for each Severity.
- Select a Severity from the drop-down.
- Enter the maximum first Time to Response and Time to Resolution for issues with this Severity.
- If you're only tracking either Response Time or Resolution Time and don't need both, then set the one not needed to 9,999 hours to allow ample time to keep the issue from going out of compliance.
- Define Coverage availability for issues with this Severity. If 24 hours a day, select Enable 24 Hour Support. Otherwise, select availability through Coverage Days and Coverage Times.
- For customers using SLAs across multiple time zones, the SLA looks at the Server Time Zone so coverage times must be offset accordingly. For customers using Issuetrak’s cloud services, the Server Time Zone is set to ET (GMT-5).
- For customers using SLAs across multiple time zones, the SLA looks at the Server Time Zone so coverage times must be offset accordingly. For customers using Issuetrak’s cloud services, the Server Time Zone is set to ET (GMT-5).
- Click Add Terms.
A confirmation message will display when this process is complete and the terms will appear in the Service Level Terms list at the top when the save is complete.
- Repeat Steps 5a through 5d until terms for every Severity appear in the Service Level Terms List.
- Define any specific dates (e.g. holidays) that are to be excluded from Coverage terms at this Service Level using the Terms List:
- Click exempt days next to the Severity’s terms. Exempt days allow you to apply holidays to your SLAs, excluding specific dates from your SLA coverage times.
- Define all Exempt Dates for issues with this Severity in the popup window that opens. If all Hours of Operation Dates Closed, select Use Hours of Operation Dates Closed. Otherwise—or in addition to all Dates Closed —select and describe these dates via the Date Exempt calendar search and the Comment fields.
- Click Update.
A confirmation message will appear when this process is complete.
- Repeat Steps 7a through 7c until all exempt days are added for the Service Level Terms List.
- If you would like to review the complete list of terms that now exist within your system, you may click the gear icon in the upper right > under the Tools area of the Settings Lightbox, click Service Level Agreements > under the Service Levels area of the Right Quick Menu, click List Expanded Levels.
Editing Service Terms
Steps:
- Click the gear icon in the upper right > click Service Level Agreements beneath the Tools header.
- Click List beneath the Service Levels area of the right quick menu.
- Click terms next to the Service Level that contains the terms you would like to modify.
- To make changes to the Response, Resolution, and/or Coverage times, click edit next to the current terms in the Service Level Terms List.
- Make your changes in the Edit Service Level Terms page that opens.
- Click Update Terms.
A confirmation message will appear and the revised terms will appear in the Terms List at the top when the save is complete.
If you need to change specific dates (e.g. holidays) that are excluded from Coverage times:
- Click exempt days next to the current terms in the Terms List.
- Make your changes in the Terms Exempt Dates pop-up window that opens.
- Click Update.
A confirmation message will appear when this process is complete.
Deleting Service Levels
Steps:
- Click the gear icon in the upper right > click Service Level Agreements beneath the Tools header.
- Click List beneath the Service Levels area of the right quick menu.
- Confirm your decision by clicking OK on the verification popup.
A confirmation message will appear when this process is complete.
Service Level Agreements define the quality of service that specific organizations, groups, and / or assets should receive. Each agreement includes its own Default Severity, as well as a Start and End Date. It may also have list of Subscribers that notifies additional users (or groups) of the following:
| Notification | Definition |
|---|---|
| Response Reminder | First Response time is halfway over. |
| Response Alert | First Response time exceeded (Out of Compliance). |
| Resolution Reminder | Resolution time is halfway over. |
| Resolution Alert | Resolution time exceeded (Out of Compliance). |
These Notifications are automatically sent to an issue’s current Assignee and Next Action.
From an SLA's Start to End Date, the Service Level in effect is displayed in that organization, group, or asset's record. All users can view the Terms by clicking on the Service Level name.
Regardless of its Start Date, an SLA is automatically applied only to new issues submitted after the date and time it was saved to your system. However, it can be manually applied to existing issues submitted on or after their Start Date by updating their Severity (or any other value). More importantly, if an issue simultaneously qualifies for multiple SLAs, only one can be applied. This will be the Asset’s SLA—or if there is no Asset SLA—the Group or Organization SLA with the strictest Terms.
While the Agreement determines the default Severity, a user with the permission Can select Severity when submitting and maintaining SLA issues may change the value, potentially changing the terms that apply to the issue.
The system also tracks First Response Time and First Call Resolution information.
First Response Time
- When the First Response Time field is added to the Issue Form(s), the field is automatically populated with the date and time an initial response is added.
- If the field is not present on the form, the information is still captured and can be accessed through reports.
First Call Resolution
- When the First Call Resolution field is added to the Issue Form(s), the checkbox (or field) appears on every facet of an issue except the Submit Issue screen. The checkbox is automatically selected when the Submit and Close button is used from the Submit Issue screen, or it can be manually selected from the Close Issue screen.
- If the field is not present on the Issue Form(s), the value will always remain set to No, even when the Submit and Close button is used.
All users can view First Response and First Call Resolution data within issues and reports. Only users with Can edit Issues and Can modify the First Response Time entered in Issues permissions can change an issue’s First Response Time values.
Adding Service Agreements
Only users with Sys Admin or Can access and maintain Administration functions permissions can add, edit or delete Service Agreements within your system.
Subscribers for Service Level Agreement can be added to an Agreement (from the Edit screen) only after the Agreement has been saved.
Steps:
- Click the gear icon in the upper right > click Service Level Agreements beneath the Tools header > click Add beneath the Agreements area of the right quick menu.
- Select the Client Type and name.
- Select the Service Level for this Agreement.
- Select the Default Severity for this client’s issues.
- This value will only be used when the issue submitter cannot or has not specifically selected one.
- Use the calendar search to define the Start Date and End Date of the Agreement.
An SLA is automatically applied only to new issues submitted after it is saved but can be retroactively applied to existing issues from Start Date by updating their Severity (or other value).
-
Click Save.
A confirmation message will appear when this process is complete.
Editing Service Agreements
Steps:
- Click the gear icon in the upper right > click Service Level Agreements beneath the Tools header > click List beneath the Agreements area of the right quick menu.
- Click the number next to the Service Level that contains the Agreement you are modifying.
- Click edit next to the Agreement in the Client List that appears.
- (Optional) Before making any other changes on the Edit Service Level Agreement screen, use the View/Maintain Subscribers... link to add or change member settings on this SLA’s list of Subscribers:
- Response Reminder 1st Response term halfway over
- Response Final 1st Response term exceeded (Out of Compliance)
- Resolve Reminder Resolution term halfway over
- Resolve Final Resolution term exceeded (Out of Compliance)
SLA-based Notifications are automatically sent to an issue’s Assignee and Next Action by default, and thus do not need to be added to the distribution list.
-
Make your changes in the Edit Service Level Agreement screen.
- Click Update.
A confirmation message will appear when this process is complete.
Deleting Service Agreements
Steps:
- Click the gear icon in the upper right > click Service Level Agreements beneath the Tools header > click List beneath the Agreements area of the right quick menu.
- Click the number next to the Service Level that contains the Agreement you are deleting.
- Click del next to the Agreement in the Client List that appears.
- Click OK when prompted to confirm.
A confirmation message will appear when this process is complete.
