When using Issuetrak, the look and feel of the site are important as it helps provide additional information or better expresses the usage and usability of the site for your users. Whether this is the login screen having additional text or images or issue submission screens having text advising what information needs to be filled out, having the ability to customize the text using HTML code is helpful to better customize your site to your needs.
HTML can be added in multiple locations, however, some locations do have a character limit which may limit the amount of additional formatting that can be added.
HTML code allows for you to add additional functionality to your site, for example:- Images that can not only be used as images, but as links to take a user to another page in your site or article in your Knowledge Base.
- Collapsible field sections allowing text or additional information to be hidden and once clicked, expanded to show additional details.
Locations that can have HTML code added
It is possible to add images wherever HTML code can be added to a screen.
Note: Images must be placed in a publicly accessible area in order for them to load to a user. The easiest way to do this is through a Knowledge Base article used as an Image Repository.
| Screen | Location to edit |
|---|---|
| Login Screen | Click the gear icon in the upper right > click on Site Appearance beneath System. |
| Home screen for Agents | Click the gear icon in the upper right > click on Site Appearance beneath System. |
| Issue Forms | Click the gear icon in the upper right > click on Issue Forms beneath Issue Setup > edit the screen in question > Add Screen text. |
| Email Notifications | Click the gear icon in the upper right > click on Custom Messages beneath Email > select the Event you wish to edit, such as on note for when a note is added to an issue. |
| Knowledge Base |
|
Adding Images
If you are not adding an image directly to a note or description field in an issue, the best way to host and display images on your Issuetrak site is to upload them into a Knowledge Base article and reference the file by copying the image address and pasting it into the source code (Tools > <>Source Code) at the location where you would like to have the image appear.
- Set up your article normally. Add an article title, category, and tags as you see necessary. You may want to consider making the article private if you'd like to restrict access to your image library.
- In the article description field, press the "Insert/edit image" icon (
 ) to upload a new image.
 - Follow the prompts to upload your image. The safest way to ensure your image will appear is to choose the "Upload" option and select an image from your computer.
- After uploading your image, it will appear in the article description field. Repeat the last few steps as many times as you need to upload all of the images you desire. You can always edit the article to add more later.
- Save or Update your article. You should be directed to viewing your updated article with all of the images you've uploaded so far.
- From this view, right-click on an image and select "Copy image address".;
Use this image URL address combined with simple HTML to add images throughout your Issuetrak site. Most text fields accept HTML. Experiment with what looks best and don't be afraid to try interesting combinations!
The Login Screen and the Home Screen for Agents will need to have the code directly added to the field as these fields have a character limit that may cause your image to not render correctly, or they may not render at all.
In the below code example is an example of the format needed in order to have these images added to these screens.
Example Code
Stand Alone image:
<img src="http://{sitename}/Graphics/homeoffice-01.png" alt="" width="33%" />
Image used as a link to a Knowledge Base article:
<a href="http://{sitename}/Kb_ArticleView.asp?ArticleNbr=10" target="_blank" rel="noopener"><img src="http://{sitename}/Graphics/homeoffice-01.png" alt="" width="33%" /></a>
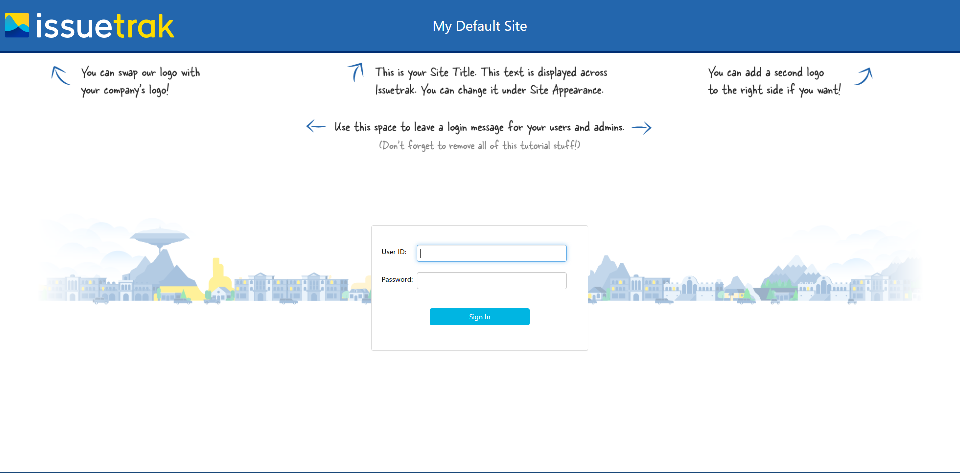
Example Login Screen
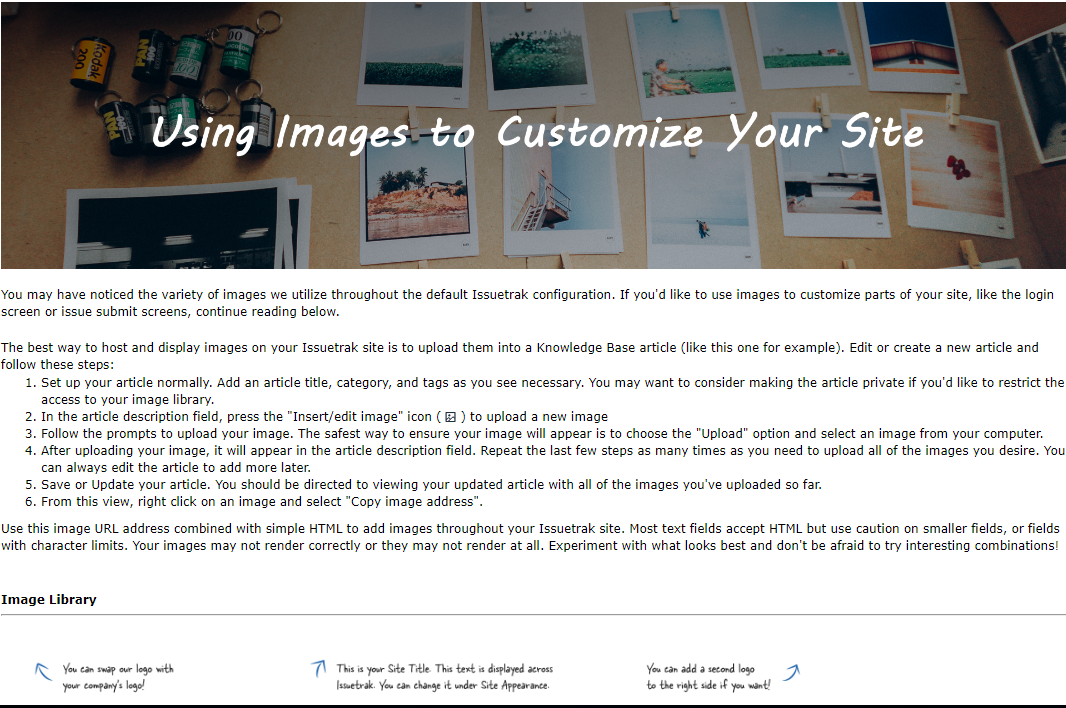
Example Knowledge Base Article
Adding Images to Issue Notifications
Adding an image to an Issue Notification (also known as Custom Messages), such as a logo, is slightly different than other parts of Issuetrak.
The image location must be in a public location as the receiver mail client cannot log into Issuetrak to pull the file directly from the Knowledge Base.
In order to allow this, there are 2 separate methods, either allowing anonymous access to the Issuetrak Knowledge Base and hosting a public article with the image in question, or hosting the file from a publicly accessible location on your our servers or image repository.
To enable the article to be accessible publicly, you will need to allow anonymous access to your Knowledge Base, once changed any article that is marked as public will be accessible even if a user does not log into the site.
Continuing from Step 5 in the the Adding Images section above:
- Click on the gear icon in the top right > Select Features beneath System.
- Scroll to the Knowledge Base section.
- Check the box for "Allow anonymous search without requiring login (public items only)".
- Scroll to the top or bottom of the page and select Update to save the changes.
To test that everything is configured correctly for the article:
Access the article that was created that has the image stored.
Right-click the image and select Copy Image Address, then paste this into a new internet browser window, and verify the image loads successfully.
Now that we have have an article with an image that is publicly accessible, we can now copy the code needed to allow this image to be added to your Custom Messages.
- Access the article in question with the image.
- Right-click the image and select Copy Image Address.
- Click the gear icon in the top right > select Outgoing email beneath the Email section.
- In the right quick menu, select Custom Messages.
- In the Event drop down, select what specific notification you want to add this image.
- In the body of the message we will need to add the HTML code for the image in order for it to be added to the messages, using the following format.
<img src="{Paste the image link here}" />
If you have an image in a public repository, you can instead paste in the file path into the link above to allow the image to load into your notifications.
Example Code
Body text in the Add Note custom message:
A note was added to the following <@IssueLabel> in <@CustomerID>:

You can reply to this message to add a note back onto the ticket or give us a call for additional support.


<@IssueLink>
<@NewestNote>
<@IssueDetails>
<@AllNotesExceptNewest>

<img alt="" src="http://{yoursite}.issuetrak.com/Graphics/issuetrak-logo.png" />
Example message on receipt
A note was added to the following issue in YourSite:
You can reply to this message to add a note back onto the ticket or give us a call for additional support.
Open in YourSite
Newest Note:
Admin on 10-May-2024:
This is an example note added to an issue.
| Issue #: | 172 |
| Subject: | test |
| Status: | Open Pending |
| Class: | |
| Issue Type: | Hardware |
| Subtype 1: | Development |
| Subtype 2: | Install new app |
| Priority: | |
| Severity: | |
| Event: | |
| Config Item: | |
| Location: | Sat1 Location1 |
| Organization: | Noc |
| Submitter: | User, Client1 on 13-Feb-2024 |
| Entered By: | Admin on 13-Feb-2024 |
| Assigned To: | *Unassigned* |
| Next Action: | *Unassigned* |
Collapsible Sections
As seen throughout this article there have been sections of text and code that have been in a collapsed state but could be expanded to see additional details.
These collapsible sections can also be added to Issuetrak's and Knowledge Base to help organize text, provide example documentation, or highlight specific information that would otherwise make a screen harder to read.
This code must be entered through the Tools > <> Source code option in the Rich Text Editor in order to properly format it on the screen.
- To add a collapsible section to an Issue Forms or Knowledge Base article we want to start by going to Tools > <> Source code.
- Copy and paste the following code to the code editor screen, if there is a different background color you wish to use, you can edit the background-color section to the Hex code for the color desired:
<div style="padding: 15px; border-radius: 8px; background-color: #75DEEF; color: black;cursor: pointer;">
<details><summary><strong>Text to click to open the collapsed section</strong></summary>

<pre>
Text\Tables\Code to show in the collapsible section.
</pre>

</details>
</div>
- Save the changes.
- On the Rich Text Editor, you should now see a collapsible section that was created.
- Edit the text to your desired text or additional HTML as you wish.
- Save or Update your article. You should be directed to viewing your updated article with all of the images you've uploaded so far.
Below is a code example to create collapsible fields in the Issue Forms.
Example Code
<div style="padding: 15px; border-radius: 8px; background-color: #E9E9E9; border: 1px solid #FFFFFF; color: #333333;">
<details><summary>Need help?</summary>
<ul>
<li>strong>Subject:</strong> What do you want to name this issue? A short summary of the problem is usually best.</li>
<li><strong>Full Description:</strong> What is the issue? Detail the problem you're encountering and any additional information that might be helpful. Insert images to provide visual examples, or use text styling to organize your description.</li>
</ul>
</details></div>
Example Code Output
Need help?
- Subject: What do you want to name this issue? A short summary of the problem is usually best.
- Full Description: What is the issue? Detail the problem you're encountering and any additional information that might be helpful. Insert images to provide visual examples, or use text styling to organize your description.
Custom links to other locations
While having a link on a page may be helpful to navigate to pages in and outside of Issuetrak, having a link look like a button or an image can help dramatically with the look and feel of your site.
To add a custom image link to Knowledge Base articles or your Issue Forms:
- In the description field, press the "Insert/edit image" icon () to upload a new image.
- Follow the prompts to upload your image. The safest way to ensure your image will appear is to choose the "Upload" option and select an image from your computer.
- After uploading your image, it will appear in the article description field. Repeat the last few steps as many times as you need to upload all of the images you desire. You can always edit the article to add more later.
- Highlight the Image you want to turn into a link and click the "Insert/edit link" icon (
 ) and follow the prompts.
 - Save or Update your article. You should be directed to viewing your updated article with all of the images you've uploaded so far, if you click on the image now it will take you to the URL input into the link.
 ) and follow the prompts.
Below is some sample code that we use on our Support site that appears in our Issue Forms. This code creates links that look like buttons that can be used to direct users to different areas in Issuetrak.
Example Code
<div style="text-align: center; font-weight: 300; font-size: 2em; padding-bottom: 10px;">Welcome to Issuetrak!</div> <div style="text-align: center; font-weight: 300; font-size: 1.5em; padding-bottom: 5px;">Please use the links below to access information from our Help Center:</div> <div style="text-align: center; padding-top: 10px; padding-bottom: 10px; line-height: 3em;"> <a href="https://helpcenter.issuetrak.com/home/2434-issuetrak-navigation" rel="noopener"class="trak-link-1"target="_blank">Navigation</a> <a href="https://helpcenter.issuetrak.com/home/1996-issue-hub" rel="noopener"class="trak-link-1"target="_blank">Issue Hub</a> <a href="https://helpcenter.issuetrak.com/home/2000-submitting-issues" rel="noopener"class="trak-link-1"target="_blank">Submitting Issues</a> <a href="https://helpcenter.issuetrak.com/home/2001-searching-issues" rel="noopener"class="trak-link-1"target="_blank">Searching Issues</a> <a href="https://helpcenter.issuetrak.com/home/2435-about-issuetrak" rel="noopener"class="trak-link-1"target="_blank">About Issuetrak</a> </div> <div style="text-align: center; font-weight: 400; font-size: 1em; padding-top:15px;"> <a href="https://helpcenter.issuetrak.com/home/2011-site-appearance" style="color: #00B5E2 ;" target="_blank"><i>Learn how to configure this message</i> ✎</a> </div>
Example Code Output
Use CSS to Override Dark Mode Colors
This section only applies to On-Premises customers, and all customizations will be cleared during site upgrades. We do not recommend customizing the CSS in Issuetrak.
You may find that certain content in your site doesn't look quite the way you want it when you're in Dark Mode, such as KB articles. If you find that something doesn't look quite right, you can use CSS to override the way it looks in your site.
While we do not recommend adjusting the CSS for your site, if you feel that you must do so, then please know that you should:
- Make sure you know how CSS works. Teaching the basics of CSS is beyond the scope of this article, but there are many tutorials that can teach you how CSS works.
- Perform the following steps in a test site to avoid causing trouble with your production site!
Where is the CSS that Controls Issuetrak's Overall Look?
Issuetrak uses a set of CSS files in the root of the web folder to determine the look-and-feel of the product. The ones we are most concerned with in this article are:
- Issuetrak.css - This contains the CSS classes for the bulk of the product. Many of the classes in this file reference custom CSS properties (specifically colors) that are in the Dark Mode CSS file.
- issuetrak_dark_theme.css - This contains the alternate color definitions (custom CSS properties) that are referenced only when Dark Mode is enabled.
- issuetrak_default_theme.css - This contains the default color definitions (custom CSS properties) that are referenced when Dark Mode is disabled. We won't be adjusting these in the examples below, since this section is focused on Dark Mode.
With the knowledge of the two files above, we will build small examples to demonstrate how it works further below.
Pre-made CSS Classes
Before we dive into the nuts and bolts of the example exercises, you should know that we've already created some CSS classes to help you keep your site customizations legible while they are viewed in Dark Mode. Issuetrak has developed four CSS classes that you can apply anywhere that you can customize the HTML in your site:
.trak-alert-div-1 {
  width: 100%;
  padding: 15px;
  background-color: #fffce6;
  background-color: var(--trak-alert-div-1-background-color);
  border-radius: 8px;
}

.trak-alert-header-1 {
  font-size: 18px;
  font-weight: bold;
  color: #eb1b00;
  color: var(--fail-text);
}

.trak-link-1 {
  white-space: nowrap;
  background-color: #E9E9E9;
  background-color: var(--trak-link-1-background-color);
  border-radius: 14px;
  padding: 5px 15px;
  margin: 0 10px;
}

.trak-link-2 {
  white-space: nowrap;
  background-color: #f6f6f6;
  background-color: var(--trak-link-2-background-color);
  border-radius: 14px;
  padding: 5px 15px;
  margin: 0 10px;
}
Of particular note is .trak-link-1, which you can apply to site appearance customizations in place of inline styling. Text with this class applied to it should render noticeably better when viewed in Dark Mode than when the class isn't applied.
In this first example, you can see site customization code without the trak-link-1 class applied, as well as a screencap that shows the site customization in Dark Mode is harder on the eyes and more difficult to read:
<a class="trak-link-1" href="https://helpcenter.issuetrak.com/articles/2340-Current-Release-Notes" target="_blank" rel="noopener"><b>View</b> the release notes</a>

And below, you can see the same site customization has been modified to instead apply the trak-link-1 class, and the screencap below it which displays a much improved appearance and legibility.
<a style="background-color: #F6F6F6; border-radius: 14px; padding: 5px 15px; margin: 0 10px;" href="https://helpcenter.issuetrak.com/articles/2340-Current-Release-Notes" target="_blank" rel="noopener"><b>View</b> the release notes</a>

Example Exercise 1: Adding a New Custom CSS Property
This section describes how to create a new custom CSS property that will be applied to an element of your choosing when Dark Mode is enabled.
Steps:
- Open your Issuetrak site's web folder.
- Open the file issuetrak_dark_theme.css in an advanced text editor such as Notepad++. This file contains the styling that makes Dark Mode what it is.
- Add a custom CSS property to this file within the :root element. Give it a unique name. This custom property will be applied only when Dark Mode is active. Save the changes you made. For example purposes, let's add custom property named generic-background with a value of #630b0b. Such an entry will turn any future associated element dark red, and the entry will look like:
--generic-background: #630b0b;
- Add a custom CSS property to this file within the :root element. Give it a unique name. This custom property will be applied only when Dark Mode is active. Save the changes you made. For example purposes, let's add custom property named generic-background with a value of #630b0b. Such an entry will turn any future associated element dark red, and the entry will look like:
- Open the file Issuetrak.css in an advanced text editor such as Notepad++. This file contains most of the CSS styling used in Issuetrak.
- We now need to associate the custom property we defined above with a CSS class defined in this file. To further our example, we will apply the custom property to the dashboard panels. Do a CTRL-F to search for ".dashboard-panel {", then add the following new line within the class and save the file:
background-color: var(--generic-background);
- We now need to associate the custom property we defined above with a CSS class defined in this file. To further our example, we will apply the custom property to the dashboard panels. Do a CTRL-F to search for ".dashboard-panel {", then add the following new line within the class and save the file:
- Navigate to your Issuetrak site and take note of its normal Dashboard background color.
- Now click on your username in the upper right corner and choose Enable Dark Mode.
Note that the Dashboard background is now dark red.
Example Exercise 2: Adding a New CSS Class
This section describes how to create a new CSS class that you can associate your custom CSS property with, then subsequently use in HTML to reduce reliance on inline styles. We will utilize the custom CSS property that we defined in the previous section.
Steps:
- Open your Issuetrak site's web folder.
- Open the file Issuetrak.css in an advanced text editor such as Notepad++.
- Create a new class and then save the file. In this example we will call this class red-bg.
.red-bg {
background-color: var(--generic-background);
}
- We now have a new CSS class. But since it's brand new, nothing in Issuetrak is associated with it. You can apply this class to anything in Issuetrak that you can define in an HTML <div> tag, such as fields on the Site Appearance screen or in Knowledge Base articles. In this example, let's enclose the entire content of a KB article in a <div> that specifies our new class:
<div class="red-bg"> <p>In this example article, we will discuss the merits of pastries and why you should consume them.</p> <p> </p> <ol> <li>They are delicious.</li> <li>You can have them for breakfast.</li> <li>You can have them for lunch.</li> <li>You can have them for dinner.</li> <li>You can obtain all of the calories that you need to exist by consuming pastries.</li> </ol> <p> </p> <p>Most of the pastries this author has encountered were baked. However, there are fried varieties as well: Donuts and funnel cakes. These fried varieties should be seriously considered as a primary source of sustenance. </p> </div>
You will now have an article that looks 'normal' when Dark Mode is disabled but will be displayed with a dark red background when Dark Mode is enabled.
In this example, we enclosed the content of the entire article in our custom CSS class. But you can target individual elements in a similar <div> (or other HTML tag) to achieve more focused results. Additionally, multiple properties can be specified in your custom class, or you can choose to specify multiple classes in any <div> (or other HTML tag) to stack the properties that you want. There's a large degree of design freedom to achieve the results that you want.
